While content creation in WordPress, having the right editor is important. Whoever installed the latest version, the Gutenberg Editor has become the default option where someone can experience block-based editing. It creates a modern at the same time dynamic experience for crafting engaging content. However, you still might want to stick with the familiarity of the Classic Editor or explore alternative options.
So, in this guide, we will guide you on how to enable or disable the Gutenberg Editor in WordPress so that you can leverage content creation according to your preference. Whether you’re seeking block-based customization options in WordPress or just don’t want to leave the familiarity of Classic Editor, we’ve got you covered. So, let’s dive in to discover the fullest control of WordPress customization, staying in your comfort zone.
What is Gutenberg Editor?
Gutenberg Editor refers to an editing system that makes website customization fully intuitive and dynamic using blocks. These blocks can be easily added, rearranged, and customized so that you can have greater flexibility and visual control over the layout of the content.
Besides, unlike WordPress classic editor, Gutenberg Editor has drag-and-drop functionality so that you can experience a seamless and smooth user interface.
How to Enable or Disable Gutenberg Editor in WordPress
People switch between Gutenberg and WordPress Classic Editor for various reasons. Some might think Gutenberg is not fully stable to adopt or some might want to shift to Gutenberg because of the complexity of WordPress Classic Editor.
Everyone thinks differently. However, no matter what editor you want to use, one thing is sure. You can’t keep both editors enabled on your site. Either you have to enable or disable Gutenberg Editor. But, how?
No worries, here we will demonstrate how to enable or disable Gutenberg Editor in WordPress by adopting only two easy steps. So, let’s go through the steps and learn enabling or disabling Gutenberg Editor:
Step 1: Install a Plugin.
In the first step, you have to select a plugin to enable or disable the block editor. Here we’re using the “Disable Gutenberg” plugin since it has great options for individually disabling block editor for user roles, post types, templates, etc.
Besides, it has more than 700,000 active users which reflects a strong user base. So, here we will install “Disable Gutenberg” and show the complete process using this plugin.
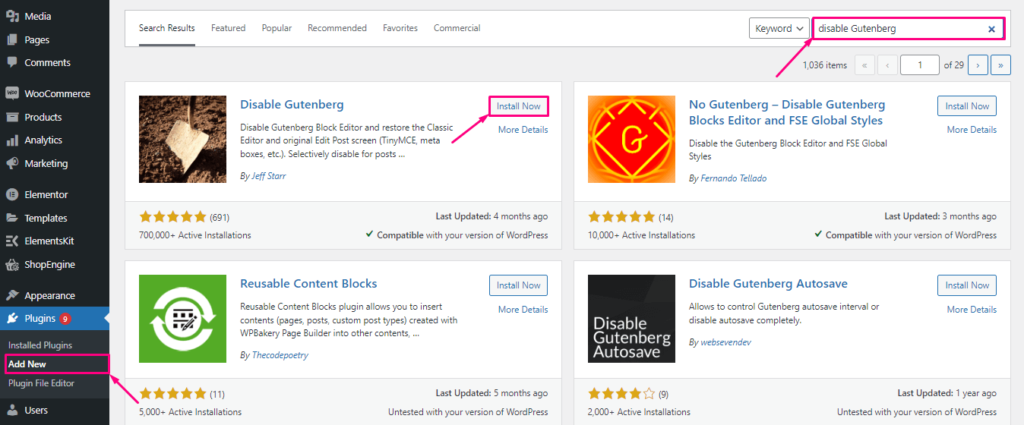
Now, to install “Disable Gutenberg”, go to your admin panel and follow Plugins >> Add New. Here, type “Disable Gutenberg” in the search bar and hit the enter button. After searching, you will get to see the plugin.
Now, all you have to do is press the “Install Now” button. It will take a few seconds to install. After installation, click the “Activate” button. This will make Disable Gutenberg activated on your site.
Step 2: Configure Settings.
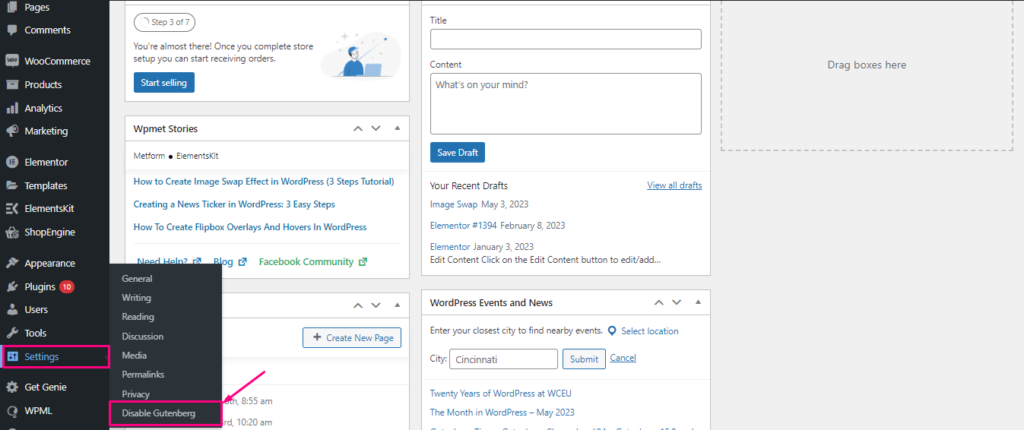
In the second step, you have to perform some setting configuration. To do that, click the “Disable Gutenberg” option under Settings.
This will redirect you to the Disable Gutenberg page from where you will find an option called “Disable Gutenberg Everywhere”. This option will let you disable Gutenberg from everywhere on your site by right-clicking the checkbox.

However, you can also disable Gutenberg for different user roles. For example, if you want to disable the block editor for Author and Contributor, you can easily do that by right-clicking the checkbox.
Moreover, you can also disable the block editor for separate post types such as posts, pages, landing pages, templates, widgets, products, orders, and so on.

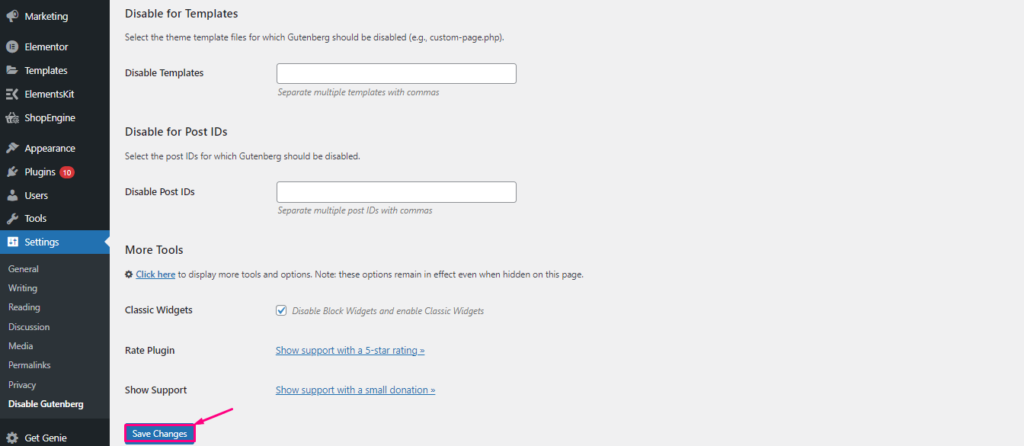
After making all the adjustments, press the “Save Changes” button. Thus, disabling the Gutenberg editor for the selected field will be saved.
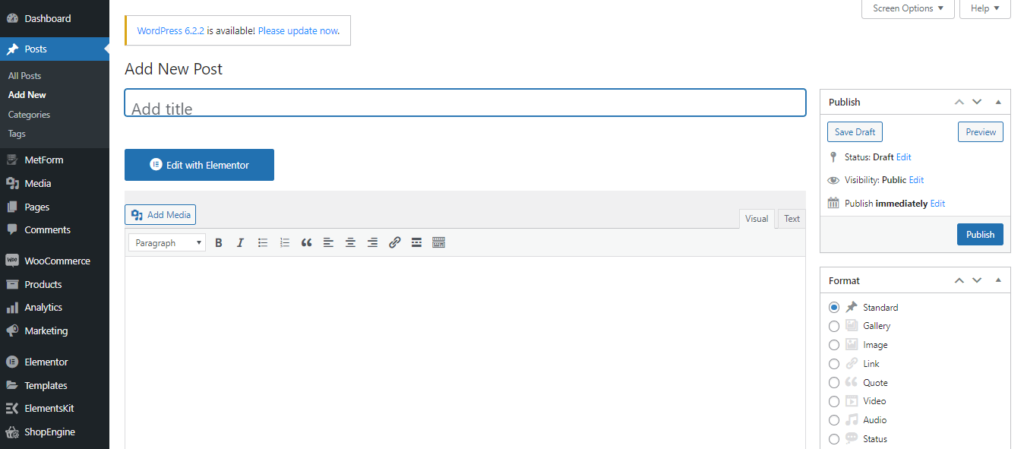
Now, if you visit those sections, you will get to experience the Classic Editor.
Following the same process, you can also enable Gutenberg Editor. All you need to do is unmark the “Disable Gutenberg Everywhere” checkbox and hit the “Save Changes” button. Thus, you set the Gutenberg Editor enabled on your site.
Is Disabling Gutenberg Editor Good Choice?
Whether you should enable or disable Gutenberg Editor or not completely depends on your specific needs and preferences. The answer varies from person to person. If you’re more accustomed to the classic editor and want to use it out of comfort, it might be a great choice.
However, if you want to escape from the hassle of coding, adopting a Gutenberg Editor is a wise decision. Because Gutenberg allows you to do everything using blocks which is a non-code solution. You can even build themes using its blocks. So, whether disabling Gutenberg Editor is a good choice or not completely depends on your requirements. Besides, you can also read the blog Gutenberg Editor vs Classic Editor to find which one aligns with your needs.
Summing up
Now that you’ve learned how to enable or disable the Gutenberg Editor in WordPress, you have the power to customize your editing experience to match your preferences and requirements. Whether you choose to embrace the dynamic block-based approach of Gutenberg or stick with the familiarity of the Classic Editor, WordPress offers you the flexibility to create content in a way that suits you best. So, take full control of your editing environment and embark on a seamless content creation journey with the knowledge gained from this guide.




Leave a Reply
You must be logged in to post a comment.